
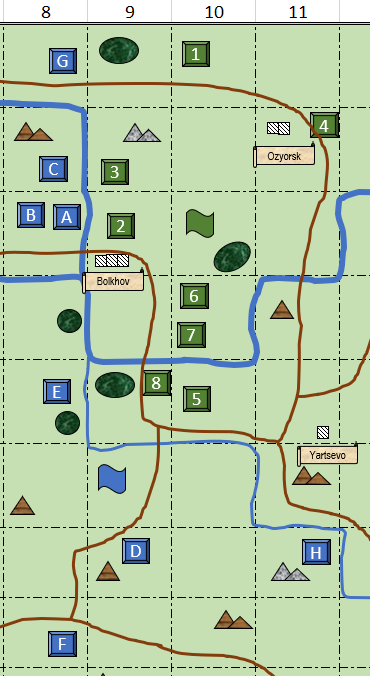
This is the situation at the beginning of Day 3:

The campaign already rewards me with an interesting strategic situation. French commander Ramille has I Corps in Bolkhov (C9) but his back is against the river and he is outnumbered 3:2 by the Russians around Ozyorsk (B11). II Corps is relatively free to move but if the Russians gain the initiative and act quickly, they can cut off the Prussians from I Corp’s flank or II Corps from supporting I Corps in a battle. Ramille writes three sets of orders. One for moving II corps up, one for moving the Prussians down and II Corps moving to Yartsevo (E11) and one where I Corps move back into a better position while II Corps moves up to give flank support.
The Russians have another problem. Although they have a better concentration of force, they have no idea where half of the French forces are. Nevertheless B9 and E9 seem to be strong blocking positions. Two alternative order sets will be about priority of blocking force movements while the bulk of the army advances to Bolkhov. The third option will be a passive one, where only the flanks advance.
French Orders of the Day
I Corps (A, B, C): Fall back to (north)west of Bolkhov.
II Corps (E, D, F): Move towards south of Bolkhov and secure the crossing at E9 as well as I Corp’s flank.
von Steuen (G): Fall back to A8 in support of I Corps.
Faltenbach (H): Swing east of Corps II towards Yartsevo (E11) but don’t overextend.
Russian Orders of the Day
Medhorovcky (3): Move between enemy G and Bolkhov into a blocking position.
Column Zimin (8, 5): Move into a blocking position so that enemies cannot advance north from E8-E9.
Column Koltsov (1, 2, 4, 6, 7): move southwest into battle positons for an attack against the forces in and around Bolkhov.
Day 3 Begins
Ramille’s orders for von Steuben get intercepted by enemy skirmishers and are lost. Corbin (D) receives orders after spending 4 pips, Faltenbach (H) after 2 and Pirot at the end of the day.
Vorodnin (1) and Koltsov (4) will receive orders after 5 pips. All other orders get through quickly, as the Russians are more condensed. Initiative goes to the Russians.
The Russians quickly achieve their blocking positions north and south of Bolkhov. While moving, they also spot some missing French forces. Meawhile the French slowly fall back behind the river. As Davydov withnesses the French leaving Bolkhov he uses the opportunity and takes the city (rolled for either passive or aggressive move, got the latter).
Note: Situations like these open up opportunities for skirmish wargames. Fighting at the outskirts of the city for example. If the Russians win Davydov advances. As I don’t like skirmish games I went with dice. But for anyone interested in such campaigns this tip might be helpful.
As Ménard’s Division (E) gets into gears his scouts report strong Russian forces on the other side of the bridge. With the bulk of II Corps behind him, he decides to don’t wait in position but to flank west to stay linked up with I Corps.
Up north Koltsov and Vorodnin stay in position for most of the day. As orders arrive they don’t agree how to read and act upon them this late in the day. While Koltsov moves west to stay in contact with force G, Vorodnin moves south towards the rear of other Russian forces.
The rest of II Corps and the Austrians split farther apart due to lost or late orders. Faltenbach was well on his way to I11 when he got new orders and is now in position to move into the opponent’s rear area.
This is the situation at the end of day 3. For the first time, both sides have battle options for day 4. The French foresaw strong Russian flanking moves but failed to counteract them. Still, they have managed to keep their forces at least somewhat connected, thanks to the fall back move and Ménard’s (E) own initiative. Russian aggressiveness came at a prize. Enemy forces suddenly appeared near the rear. The area should have been protected by Column Zimin (8, 5) but they moved west. What’s more, is that the Russians have not spotted D approaching and still don’t know where F is. In contrast the French only lost sight of force 4.
The French gain initiative to declare battles for the next day and do so twice! The upper one has been declared to keep Russian forces in place. Terrain and positioning is rather bad for both sides but the French want to keep the enemy from supporting the battle to the south.
The southern battle is what the French really want. They have only E committed and three forces in reach within a wide flanking arc.

Day 4
As the forces array for battle commanders hastily dictate their orders for the not yet engaged formations. The French orders all revolve around setting up the southern battle. Either they flank heavily or they set up a traditional battleline with only Falkenbach flanking or they block battlespaces early to constrict Russian battle spaces and moves.
The Russians have the opportunity to concentrate on the northern battle and only send a token force to the lower one. They can also try to block battlespaces in the southern battle early to have a strong initial presence on the field, albeit with many French flank marching troops. Or they deliberately concentrate their forces in the southern battle into a small area to prevent being outflanked.
French Orders of the Day
Corbin (D): Move to F10 to block enemy flanking movement
Pirot (F): Enter battle at F9.
Faltenbach (H): Try to flank from E10 or move towards F 9 if not possible.
Russian Orders of the Day
Vorodnin (1) and Koltsov (4) enter the battle at A9.
Ilyin (7): Enter the battle at E9 if possible, else at D9.
Nosov (6) and Beretschov (5): Enter the battle at B/C9.
Day 4 Pre-Battle Maneuvers
All orders went through. The Russians successfully hampered Faltenbach’s flanking maneuver by moving late. This had unforeseen consequences, however. Beretschov, slated to tip the northern battle in even more numerical favor was hindered by French forces moving to his flank and couldn’t reach the upper battle. In the end neither side got what they wanted.

This is the situation before the battles begin. 5, D and H will be supports for the southern battle.

Interested to see this! Have the battles happened yet? Or has coronavirus suspended hostilities?
LikeLike
One battle has been fought so far. Unfortunately, a non-Covid-19 illness made it impossible for me to move around the table and push little soldiers into each other.
LikeLike